
As a licensed cosmetologist (of 14 years), I have never experienced someone commenting about how I should take care of my hair or worse, not receiving any comments whatsoever. I moved to the high desert in August of 2012. The water here is well, less than desirable IMO. We have yet to purchase a water softener so I am having to make due. After leaving Biolage in the cabinet, I tried organic shampoo types and nothing helped! It knotted severely in the shower. It took nearly 20 minutes to comb / brush it out. I did not look forward to washing my hair. Then it dawned on me - I needed to try this 'no poo' method. After 6 weeks, I'm thankful that I did!
I brushed my hair first to remove any tangles then I washed my hair with Dr. Bonner's Castile soap (bar) and then did a rinse of 3 T of baking soda in 8oz of boiled (then cooled) water. I lathered the soap in my hands then rubbed into my hair and scalp. I took the bar of soap to my hair and rubbed it back and forth. I got a good lather plus the soap smells nice. This part right here made the transition easy. I rinsed it with the baking soda and water because the soap leaves a film that you do not get with traditional shampoos.
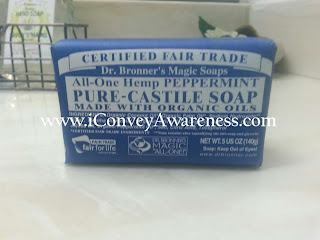
After researching no poo for my hair type, I created a recipe. Well, it's a several step recipe but it's been working wonderfully. Maybe you can try it too!
My hair is long (middle of my back), is thick, and is naturally wavy. I have never dyed my hair (yes you read that right! A licensed cosmetologist whose never dyed her hair!!) and before moving here was very healthy; never a split end, radiant, and soft!
The first time you go no poo, it can take up to 6 weeks before your hair detoxes. You may go through oily phases or just a different appearance. I have to say that I've enjoyed the detox phase. A little oil in my hair has always been okay because it helps it grow!!
I need to get my hair cut. I'm scheduling myself in by the end of April. It is overdue but I didn't want to stop in the middle of the detox because I wanted to help repair my ends before cutting off too much. I'm looking to get an inch or two off max. I like to wear pony tails and no make up. I embrace my natural beauty.
Ready? Here it goes!!
Day 1 - February 24, 2012
 |
| Before no pooing. |

I then did a rinse on my hair with two ingredients. First it was 2 T of ACV (apple cider vinegar) to 6oz of boiled (then cooled) water. I only poured this rinse on my ends (from the nape of my neck to the ends). Rinsed in water. The ACV neutralizes the hair then I had read that if you have dry hair to rinse your hair in lemon juice and water. My second rinse was freshly squeezed lemon juice in 6oz of boiled (then cooled) water. I pour this second rinse on the ends only. I left it in my hair while I finished bathing. Rinsed at the end. The best part of this first day? Effortless brushing!!
 |
| After no pooing and 3 rinses. |
Day 2 - February 28th, 2012
I shared with friends that I was no pooing and one gave me a recipe she uses. So, I decided to try her recipe instead of the castile bar soap method this day.
 |
| Before 2-28-12. |
2T of raw honey (melted if solid), 2T of baking soda, a little spring water to make it into a paste, and 5 drops of Tea Tree oil (optional).
Washed hair using this 'paste' and then rinsed it following the steps from day 1. ACV with boiled (then cooled) water then the lemon juice and water rinse.

 |
| My son had to be in the image! =) |
 |
| A bit heavy on top (from oils even after washing hair). |
Day 3 - March 6, 2013
Used Dr. Bonner's castile soap (this is gentle enough to shave with as well!) with the two rinses (ACV and lemon juice). I'm alternating between methods at each hair washing.
I found that my ends were still dry. The last two times I washed my hair I did not apply any product. In between washes, I wrap my hair at night and have a silk like pillow cases (more like satin) to reduce breakage. I was adding coconut oil on my ends between washes to keep them soft and more manageable. Brushing daily. Spritzing with water and adding the coconut oil as needed. Don't get over zealous like I did because it's easy to go overboard.
This date, I added coconut oil (about 1 tsp; melted in my hands) to my ends (from nape of my neck to the ends) after washing and rinsing and after brushing. I found that it made a bigger difference in the appearance of my hair the day of and the days following no pooing.
Day 4 - March 12, 2013
Honey, baking soda, water with 3 rinses. Followed with a teaspoon of coconut oil to the ends.
Day 5 - March 19, 2013
Castile soap, baking soda and water rinse then ACV and lemon rinses followed by coconut oil to ends.
Day 6 - March 24, 2013
Honey method, 3 rinses, coconut oil
Day 7 - March 29, 2013
Castile soap, 3 rinses, coconut oil


 Day 8 - April 6, 2013
Six weeks of no pooing! I'm happy that I took the plunge. I have enjoyed seeing the natural red-lights coming out in my hair.
When exercising, I pull my hair up and off my neck. It just started getting warm here and I'll be washing hair more frequently than I have been in the past 6 weeks as the temps keep rising.
To save time, make up to 16 oz of boiled then chilled water for your baking soda, ACV and lemon juice rinses. For my hair length and thickness, I use about 1/3 of 16oz each time I wash my hair. Eventually, I'll be getting some larger containers to keep the mixtures in for it to last longer.
I will update this post with an image when I get my ends trimmed. If you have any questions about my process or if I can encourage you in yours, please leave a comment.
Updated, May 20, 2013:
This is one week past my trim. About 2 inches was taken off the bottom. Still going no poo but purchased a new product called Alaffia from the health food store, The Whole Wheatery. I've used it only once thus far so it's too early to report on those results and I'll update this post if the results are successful.
Updated, June 25, 2013:
Alaffia ended up being too heavy for my tresses. So I ended up washing my hair with Biolage shampoo to remove the build-up of the heavy oils then used Original Sprout's Luscious Island conditioner. After two washes the build up was gone. I went back to no-pooing and rinsing every other time with the ACV and water only. NOTE: The scent of the ACV will remain in your hair and if you're like me and don't care for a vinegar smell, you'll want to make a DIY air freshener using distilled water and essential oils and spraying your hair with it as it dries. Your hair will smell like the essential oils and not the ACV. However, if you use the Original Sprout product, your hair will smell lovely!
Updated, August 19, 2013: I picked up a shampoo bar from Tehacha-Bee Farm at the Mountain Festival in Tehachapi. It is a lot like Dr Bronner's castile soap mentioned above. I have only used it twice and it is lovely. I will report again when it's been awhile.
I still add coconut oil to my hair after it's been brushed/combed.
Thank you very much for your generosity in helping to offset the costs of website upkeep, so that I can keep sharing wellness resources with my community and beyond.
Updated, May 20, 2013:
This is one week past my trim. About 2 inches was taken off the bottom. Still going no poo but purchased a new product called Alaffia from the health food store, The Whole Wheatery. I've used it only once thus far so it's too early to report on those results and I'll update this post if the results are successful.
Updated, June 25, 2013:
Alaffia ended up being too heavy for my tresses. So I ended up washing my hair with Biolage shampoo to remove the build-up of the heavy oils then used Original Sprout's Luscious Island conditioner. After two washes the build up was gone. I went back to no-pooing and rinsing every other time with the ACV and water only. NOTE: The scent of the ACV will remain in your hair and if you're like me and don't care for a vinegar smell, you'll want to make a DIY air freshener using distilled water and essential oils and spraying your hair with it as it dries. Your hair will smell like the essential oils and not the ACV. However, if you use the Original Sprout product, your hair will smell lovely!
Updated, August 19, 2013: I picked up a shampoo bar from Tehacha-Bee Farm at the Mountain Festival in Tehachapi. It is a lot like Dr Bronner's castile soap mentioned above. I have only used it twice and it is lovely. I will report again when it's been awhile.
I still add coconut oil to my hair after it's been brushed/combed.
I do receive a small
commission from Amazon.com if you purchase anything through their site using
one of the links above (read my full advertising disclosure here).
Thank you very much for your generosity in helping to offset the costs of website upkeep, so that I can keep sharing wellness resources with my community and beyond.
Download my free eGuide when you subscribe to my monthly
newsletters for free.
Choose, eat, and live well!
=)


